For small farms that are using SharePoint Server 2010, a fully functional enterprise
search topology can be created by running the Farm Configuration
Wizard; this can support an index of up to 10 million crawled documents.
However, for large deployments, you must create your own search
topology that suits your specific needs. You can create such a search
topology using Windows PowerShell or the search administration pages
contained within the SharePoint 2010 Central Administration website.
SharePoint Server provides 126 Windows PowerShell cmdlets to create and
manage enterprise search.
The search topology can
consist of one or more Search Service Applications (SSA). Each SSA
contains one or more query components and one or more crawl (content)
components. Typically, the search administration component runs on the
same server as the crawl components. Each crawl component is associated
with one crawl database and crawls the content that is specified in that
database. Query servers serve the results of queries to the Web servers
and hold either the entire index or one or more index partitions of the
index. Each index partition includes at least one query component,
which services the results for its portion of the index.
1. Creating and Managing Search Application Topology
The SSA object is perhaps the most important object when managing your search topology. Type the command Get-SPEnterpriseSearchServiceApplication | get-member
to see the number of properties and methods available for the SSA
object. Without an SSA, you cannot create any other search-related
objects. When you run the Farm Configuration Wizard, an SSA and its
related SSA proxy are created and associated with the default service
application proxy group. The SSA proxy connects Web applications to the
SSA and the service application proxy group and groups together the
service groups associated with a Web application.
Using the browser and the
SharePoint 2010 Central Administration website, you can manage which
service applications are associated with the proxy group by clicking
Application Management in the navigation bar on the left side of the
site. Then, in the Service Applications area of the page that opens,
click Configure Service Application Associations.
To manage individual
SSAs, click Manage Service Applications in the Service Applications area
and then click the name of the SSA. For example, the SSA created by the
Farm Configuration Wizard is named Search Service Application. The
Search Administration page will be displayed when you click the name of
the SSA, and at the bottom of the page, you will see details about the
search application topology, as shown in Figure 1.
Several SharePoint Server cmdlets help you manage an SSA topology; the objects and associated cmdlets available are listed in Table 1. For more information about the cmdlets relevant to a specific object, use a command similar to the following one.
Get-Help *SPEnterpriseSearchServiceApplication
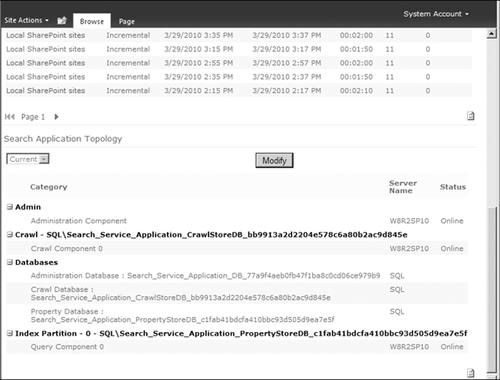
Table 1. SharePoint 2010 Enterprise Search Topology, Administrative, and Service Application Objects
| OBJECT NAME | CMDLET COUNT | DESCRIPTION |
|---|
| Topology | 2 | Imports or exports a search topology using an XML file. |
| Administration Component | 2 | Used to retrieve and configure the administrative component of a Search Service Application. |
| Service Application | 8 | Used to retrieve, configure, create, delete, upgrade, restore, suspend, and resume a Search Service Application. |
| Service Application Proxy | 4 | Used to retrieve, configure, create and delete a Search Service Application proxy. |
Creating an SSA
topology in Windows PowerShell requires the use of several other
enterprise search cmdlets, and they must be used in the correct order.
Learning the proper order for the cmdlets and any other logic you need
to create a robust set of commands comes with experience and testing. Do
not expect to correctly create a Windows PowerShell sequence of command
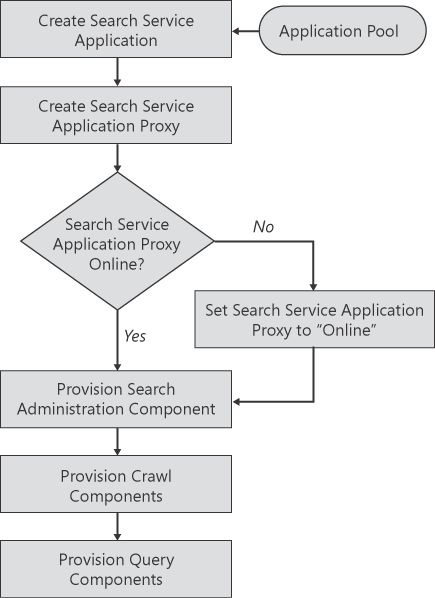
on your first attempt. However, if you make a process diagram, it will
help you identify what actions you would complete if you were using the
SharePoint 2010 Central Administration website, including what options
you would check on the pages displayed and what information would be
required. The sample process diagram shown in Figure 2 depicts the necessary components and the sequence of steps used in this section to create an SSA.
Note:
When creating a large script
for the first time, you will find it easier to use the Windows
PowerShell Integrated Scripting Environment (ISE). Remember to add the
relevant snap-ins.
To provision an SSA using Windows PowerShell, follow these steps.
Obtain
a reference to the application object you intend to use or create a new
application pool. In either case, save the reference to the application
pool object in a variable so that you can easily reference it later in
the command sequence. To list all application pools and then to save the
reference to an existing application pool object, such as SearchAppPool, in the variable, type
$AppPool = Get-SPServiceApplicationPool SearchAppPool
Or to create a new application pool, type the following command on one line.
$AppPool = New-SPServiceApplicationPool -Name SearchAppPool
   -account Contoso\zzSPServices;
where SearchAppPool is the name
of the new application pool, and Contoso\zzSPServices is a registered
managed account that will be used by the application pool. You can
register an Active Directory userid as a SharePoint managed account by
typing $cred = Get-Credential contoso\zzSPServices. You will be prompted for the password for the credentials and then you would type New-SPManagedAccount –Credential $cred.
Create
an SSA. To complete this command, you must be an administrator on the
local computer; therefore, make sure you start the SharePoint 2010
Management Shell as an administrator, and then type the following
command on one line.
$SearchApp = New-SPEnterpriseSearchServiceApplication
   -Name ContosoSearchServiceApp -ApplicationPool $AppPool;
where
ContosoSearchServiceApp is the name of the Search Service Application.
If you need to create a FAST Search Server 2010 for SharePoint 2010
SSAs, then include the –SearchApplicationType parameter with a value of ExtendedConnector.
Note:
A service application cannot
be created unless an instance of the appropriate service is started on
one of the servers in the farm. For the SSA, the SharePoint Server
Search service, OSearch14, must be running on one of the servers in the
farm. The SharePoint Server Search service is the process that will
execute the SSA code. The Search service can run on multiple servers to
share the load and provide resiliency. Use SharePoint 2010 Central
Administration to check or start this service on the appropriate
servers, or for a sample script, see “PowerShell to Create a Service
Application” at http://sharepoint.microsoft.com/blogs/zach/Lists/Posts/Post.aspx?ID=50.
To check that the service application was correctly created, review the output when you type the following command.
$SearchApp
Note:
The
New-SPEnterpriseSearchServiceApplication cmdlet creates three databases:
an Administration database, which will be named ContosoSearchServiceApp
in this example; a database for the crawl store named
ContosoSearchServiceApp_CrawlStore; and a database for the property
store named ContosoSearchServiceApp_PropertyStore. To set a different
database name, use the –DatabaseName parameter.
Create a Search Service Application proxy by typing the following command on one line.
$SearchAppProxy = New-SPEnterpriseSearchServiceApplicationProxy
   -Name ContosoSearchServiceApplicationProxy
   -SearchApplication $SearchApp;
Note:
In a Web-hosted environment, use the –partitioned
parameter with both the New-SPEnterpriseSearchServiceApplication and
the New-SPSPEnterpriseSearchServiceApplicationProxy cmdlets.
Verify that the Search Service Application proxy is online; if it is not, change the status to online using the following command.
if ($searchappProxy.status -ne "Online") {
   $searchAppProxy.status = "Online";
   $searchAppProxy.Update();
}
Verify and, if necessary, add the Search Service Application proxy to the default proxy group using the following commands.
$pg = Get-SPServiceApplicationProxyGroup;
If ($pg.Proxies -notcontains $SsearchAppProxy) {
   Add-SPServiceApplicationProxyGroupMember $pg -Member $SearchAppProxy;
}
1.1. Configuring the Search Administration Component
SharePoint Server provides
two cmdlets, Get and Set, to manage the Search Administration component.
Use the following two commands to configure the administration
component for the search application referenced in the variable $searchapp
to server SPS_APP1. If you are planning to host your crawl components
on a different server, such as SPS_CWL1, then use that server name in
the command.
$SearchInstance = Get-SPEnterpriseSearchServiceInstance SPS_APP1;
Set-SPEnterpriseSearchAdministrationComponent `
   -SearchApplication $searchapp -searchserviceinstance $SearchInstance;
Note:
In the previous example, the line continuation character (the back
tick, also known as the backward apostrophe, `) was used to insert a
line break. For long lines, using the line continuation character makes
the script more readable, especially if you keep the length of the lines
to the typical width of a screen. Then there is no need to use the
scroll bar to review all the commands. You can also break a line using
the pipe (|) character.
1.2. Provision Crawl Topology and Crawl Components
The next step in the
process of creating a search application topology is to configure the
crawl topology and components. SharePoint Server provides a number of
cmdlets to help you create and manage the crawl-related objects listed
in Table 2.
Table 2. SharePoint 2010 Enterprise Search Crawl Objects
| OBJECT NAME | CMDLET COUNT | DESCRIPTION |
|---|
| Crawl Topology | 4 | Use to retrieve, set, create, or remove a crawl topology. |
| Crawl Database | 4 | Use
to retrieve, modify, create, or remove a crawl database, which stores
the crawl history data for a Search Service Application. |
| Crawl Component | 3 | Use to create, delete, or retrieve information about crawl components from a Search Service Application. |
| Crawl Content Source | 4 | Use to create, delete, retrieve, and configure content sources. |
| Crawl Custom Connector | 3 | Use to retrieve information and register or remove a protocol for custom crawling. |
| Crawl Extension | 3 | Use to retrieve, create, or delete extension rules. |
| Crawl Mapping | 3 | Use to retrieve, create, or delete crawl mappings. |
| Crawl Rule | 4 | Use to retrieve, set, create, or remove crawl rules. |
By default, a Search
Service Application created in Windows PowerShell has a crawl topology
but is missing both crawl and query components. You can verify this by
using either the SharePoint 2010 Central Administration website or by
typing the following commands with the resultant sample output shown.
Get-SPEnterpriseSearchCrawlTopology -SearchApplication $searchapp
 Id              : 00b976d0-c8f5-4ef6-9d95-a2605a5219d9
 CrawlComponents : {}
 State           : Active
 ActivationError :
Get-SPEnterpriseSearchQueryTopology -SearchApplication $searchapp
 Id              : 62247917-0a70-4119-9a5e-f4e4c7c3408b
 IndexPartitions : {70021b8f-f583-4b1c-a238-183afaefd5a3}
 QueryComponents : {}
 State           : Active
 ActivationError :
There is also another issue:
It is not possible to add a crawl and query component to the crawl and
query topologies, because they are set as active and the state property
is read-only and therefore they cannot be changed. This is true for any
crawl or query topology, so when it is activated, if more crawl or query
servers are added to the SharePoint farm, you will have to rebuild the
appropriate topology—hence the need to script the search
topology. If you attempted to add a crawl component to the pre-created
crawl topology, you will see an error message similar to this one.
New-SPEnterpriseSearchCrawlComponent : Crawl topology is not inactive and cannot be
   changed.
At line:1 char:37
+ New-SPEnterpriseSearchCrawlComponent <<<<  -SearchApplication $searchapp
   -CrawlTopology
 $crawltop -CrawlDatabase $cs.name -SearchServiceInstance $searchinstance
    + CategoryInfo          : InvalidData: (Microsoft.Offic...hCrawlComponent:
    NewSearchCrawlComponent) [New-SPEnterpriseSearchCrawlComponent], InvalidOp
    erationException
    + FullyQualifiedErrorId : Microsoft.Office.Server.Search.Cmdlet.
   NewSearchCrawlComponent
Note:
Read-only properties can be identified using the Get-Member cmdlet in conjunction with the object’s Get- cmdlet, which in this case is Get-SPEnterpriseSearchCrawlTopology. This displays the properties and methods of the object. Property definitions that include {get;} are read-only, whereas read-write property definitions include {get; set;}.
To alter read-only properties, review the methods available for the
object and the parameters on the object’s associated Set- cmdlet, if one
is available.
The workaround for this
problem involves creating new crawl and query topologies, which when
created are set as inactive. This allows you to add components to the
crawl and query topologies. To complete this task, you must include
references to the following objects.
SSA object Stored in variable $searchapp
Server on which the crawl components are to be installed Stored in variable $searchinstance
Crawl topology Stored in variable $crawltop
Crawl store database
The variables $searchapp and $searchinstance
were initialized and used during previous steps. Now you must create
the crawl topology and obtain the reference to the crawl store. A Search
Service Application can have one or more crawl store databases
associated with it. References to these crawl stores are saved in the
SSA property crawlstores. Therefore, you can obtain the reference to a
crawl store database from the SSA variable $searchapp, which contains reference to at least one crawl store, ContosoSearchServiceApp_CrawlStore,
the one that was created when the SSA was created. To provision a crawl
component, use the following steps.
Create the crawl topology.
$crawltop = New-SPEnterpriseSearchCrawlTopology -SearchApplication $searchapp
Obtain a reference to the crawl store, ContosoSearchServiceApp_CrawlStore.
$cs = $searchapp.crawlstores | where {$_.name -match "Contoso"}
Create a new crawl component by typing the following command on one line. The sample output is shown below the command.
New-SPEnterpriseSearchCrawlComponent -SearchApplication $searchapp `
   -CrawlTopology $crawltop -CrawlDatabase $cs.name `
   -SearchServiceInstance $searchinstance;
Id              : 16e6b1e4-410f-4e94-a531-efc9dfc68a5a
ServerName      : SPS_APP1
IndexLocation   : C:\Program Files\Microsoft Office Servers\14.0\Data\Office Se
                  rver\Applications
CrawlDatabaseId : 23a83c6f-1ed3-4579-8e38-f311bbcbe4ea
State           : Uninitialized
DesiredState    : Uninitialized
When
you have added all the crawl servers (components) to the crawl
topology, set the new crawl topology as active by typing the following
command.
Set-SPEnterpriseSearchCrawlTopology $crawltop -Active
|
When you create a new crawl component, additional parameters are available with the New-SPEnterpriseSearchCrawlComponent
cmdlet to specify an index location. If you do not use this parameter,
then the default location of the index will be %ProgramFiles%\Microsoft
Office Servers\14.0\Data\Office Server\Applications. In a large
implementation, you will probably not want to leave the index at this
location or on the C drive. In this scenario, use the parameter shown in
the following command.
New-SPEnterpriseSearchCrawlComponent cmdlet, -IndexLocation "D:\SPS\Indexes"
|
1.3. Provision Query Topology and Query Components
The next task in the process is
to configure the query topology and components, which are created in a
way similar to the crawl topology and components, except that a query
component serves query results for a specific index partition and
references the property store and not the crawl store. Hence the
following directions include a step to reference the property store and
an additional step to obtain a reference to an index partition.
Note:
The crawl topology needs to be active before the query topology and components can be created. The cmdlet Set-SPEnterpriseSearchCrawlTopology,
used in the steps in the previous section, runs asynchronously, so you
should use the command $ct.crawlcomponents to check that the crawl
components are in a ready state before continuing with the following
steps.
Create the new Query topology by typing the following command on one line.
$querytop = New-SPEnterpriseSearchQueryTopology
   -SearchApplication $searchapp -Partitions 1;
Obtain a reference to the index partition.
$indexpart1 = Get-SPEnterpriseSearchIndexPartition -QueryTopology $querytop;
Create a query component by typing the following command on one line. Set the variable $searchinstance to the name of the server that is the name of your query server. The sample output is shown following the command.
New-SPEnterpriseSearchQueryComponent -IndexPartition $indexpart1 `
   -QueryTopology $querytop -SearchServiceInstance $searchinstance;
WARNING: column "IndexLocation" does not fit into the display and was removed.
Name                                             ServerName       FailoverO Sta
                                                                  nly       te
----                                             ----------       --------- ---
42592424-1915-4130-8d27-cf8d4cd2c5bb-query-0     SPS_APP1         False     Uni
Obtain a reference to the property store, ContosoSearchServiceApp_PropertyStore.
$ps = $searchapp.PropertyStores | where {$_.name -match "Contoso"};
Associate the index partition to the property store.
Set-SPEnterpriseSearchIndexPartition $indexpart1 -PropertyDatabase $ps;
When
all the query servers (components) are associated with the query
topology, set the query topology as active using the following command.
Set-SPEnterpriseSearchQueryTopology -identity $querytop -Active;
Note:
When both the new
crawl and query topologies are active, the old crawl and query
topologies will be set as inactive and can be removed using the
following commands.
Get-SPEnterpriseSearchCrawlTopology -SearchApplication $searchapp |
   where {$_.State -eq "Inactive"} |
   Remove-SPEnterpriseSearchCrawlTopology;
Get-SPEnterpriseSearchQueryTopology -SearchApplication $searchapp |
   where {$_.State -eq "Inactive"} |
Remove-SPEnterpriseSearchQueryTopology;